| Author |
Message |
emirh08


|
 Tuesday, December 01, 2015 Tuesday, December 01, 2015
Shenku wrote : Was working on this on and off, finally figured out a way to simplify the process over what I had done for Spritehaven. I present to you, character customization:
https://youtu.be/v_tEgVC2Xkg
I might end up doing a basic tutorial on how I did this at some point in the near-ish future...
Assign "attach mesh on component then from there call opponent either from get player character or from casting to specific actor?" I like your menu I did the same thing though I recommended you spice it up a little with a better Gui, though I do love it's functionality, good job 
|
Shenku
 RiO Incarnate
|
Tuesday, December 01, 2015
emirh08 wrote : Shenku wrote : Was working on this on and off, finally figured out a way to simplify the process over what I had done for Spritehaven. I present to you, character customization:
https://youtu.be/v_tEgVC2Xkg
I might end up doing a basic tutorial on how I did this at some point in the near-ish future...
Assign "attach mesh on component then from there call opponent either from get player character or from casting to specific actor?" I like your menu I did the same thing though I recommended you spice it up a little with a better Gui, though I do love it's functionality, good job
Cast to the player pawn from UMG, then pass that reference through every function call down the line until it reaches the end and finishes executing. Separate arrays for each mesh type stored in the pawn as variables (Chest, wrists/hands, legs, boots/feet, exc.), pulling those references up, using an Enum of "BodyType" from the UMG to set/select the correct mesh to replace, blah blah blah...
Suffice to say, a video tutorial showing what I did might be better, as it's a bit complex to setup and hard to explain in a single forum post... And yeah, it's nothing pretty to look at yet since I used just stock text/button styles, but I also haven't figured out yet what I want the UI to actually look like for the whole project either, so for the moment I'm working on functionality first, and stylistic appearances second.
Anyways, I've been meaning to try out live streaming for a while anyways, perhaps I'll use the tutorial for this as my first test stream and see how things go, since I need to do all this for Spritehaven now anyways... Not sure when yet, but I'll try to give a heads up before hand so anyone who wants to ask questions during the stream can do so.
|
|
emirh08
|
Tuesday, December 01, 2015
Shenku wrote : emirh08 wrote : Shenku wrote : Was working on this on and off, finally figured out a way to simplify the process over what I had done for Spritehaven. I present to you, character customization:
https://youtu.be/v_tEgVC2Xkg
I might end up doing a basic tutorial on how I did this at some point in the near-ish future...
Assign "attach mesh on component then from there call opponent either from get player character or from casting to specific actor?" I like your menu I did the same thing though I recommended you spice it up a little with a better Gui, though I do love it's functionality, good job
Cast to the player pawn from UMG, then pass that reference through every function call down the line until it reaches the end and finishes executing. Separate arrays for each mesh type stored in the pawn as variables (Chest, wrists/hands, legs, boots/feet, exc.), pulling those references up, using an Enum of "BodyType" from the UMG to set/select the correct mesh to replace, blah blah blah...
Suffice to say, a video tutorial showing what I did might be better, as it's a bit complex to setup and hard to explain in a single forum post... And yeah, it's nothing pretty to look at yet since I used just stock text/button styles, but I also haven't figured out yet what I want the UI to actually look like for the whole project either, so for the moment I'm working on functionality first, and stylistic appearances second.
Anyways, I've been meaning to try out live streaming for a while anyways, perhaps I'll use the tutorial for this as my first test stream and see how things go, since I need to do all this for Spritehaven now anyways... Not sure when yet, but I'll try to give a heads up before hand so anyone who wants to ask questions during the stream can do so.
I like that with ue4 we can do the same thing but with our own touch and execute it totally different then one another haha,anyone good work, see with me I did it a little differently I just swapped the entire blueprint though the character is using the same skeleton on all the blueprints so I don't have to create new animation assets for each character, I really do need to find a animator though, I really cbf animating everything, right now however I'm rtying to incopereate hairworks and apex clothing though the problem is hairworks only works with 4.7 and I dislike 4.7 though a user has released his own branch version that has hairworks on 4.9 but I found it more buggy then 4.7 so I'll see what happens.
|
|
Shenku
RiO Incarnate
|
Wednesday, December 02, 2015
emirh08 wrote :
I like that with ue4 we can do the same thing but with our own touch and execute it totally different then one another haha,anyone good work, see with me I did it a little differently I just swapped the entire blueprint though the character is using the same skeleton on all the blueprints so I don't have to create new animation assets for each character...
That's the nice thing about making stuff like this, there's no one definitive right way to do things.
right now however I'm rtying to incopereate hairworks and apex clothing though the problem is hairworks only works with 4.7 and I dislike 4.7 though a user has released his own branch version that has hairworks on 4.9 but I found it more buggy then 4.7 so I'll see what happens.
Haven't tried Hairworks yet, so I can't really comment on that... Apex Cloth on the other hand isn't really worth using at the moment though, since it's really inconsistent and its collision acts weird all the time, if it even collides to begin with... I'm virtually to the point of abandoning Apex Cloth from my meshes in Spritehaven because of these issues, and I've yet to see anyone who's provided any useful information on how to fix it... For the most part, it seems as if Apex isn't really even meant for anything more than simple flags or capes/cloaks, as anything that needs to be more accurately simulated than that has issues being handled on skeletal meshes during animations...
I think for ZOPU I'll stick to morph targets, like I used for Goku's hair/face animations. Maybe not the greatest solution, but it works.
|
|
emirh08
|
Wednesday, December 02, 2015
Shenku wrote : emirh08 wrote :
I like that with ue4 we can do the same thing but with our own touch and execute it totally different then one another haha,anyone good work, see with me I did it a little differently I just swapped the entire blueprint though the character is using the same skeleton on all the blueprints so I don't have to create new animation assets for each character...
That's the nice thing about making stuff like this, there's no one definitive right way to do things.
right now however I'm rtying to incopereate hairworks and apex clothing though the problem is hairworks only works with 4.7 and I dislike 4.7 though a user has released his own branch version that has hairworks on 4.9 but I found it more buggy then 4.7 so I'll see what happens.
Haven't tried Hairworks yet, so I can't really comment on that... Apex Cloth on the other hand isn't really worth using at the moment though, since it's really inconsistent and its collision acts weird all the time, if it even collides to begin with... I'm virtually to the point of abandoning Apex Cloth from my meshes in Spritehaven because of these issues, and I've yet to see anyone who's provided any useful information on how to fix it... For the most part, it seems as if Apex isn't really even meant for anything more than simple flags or capes/cloaks, as anything that needs to be more accurately simulated than that has issues being handled on skeletal meshes during animations...
I think for ZOPU I'll stick to morph targets, like I used for Goku's hair/face animations. Maybe not the greatest solution, but it works.
so you recommended skipping apex hey? hmm maybe I'll try on a simple piece of clothing if any problems at all I'll skip it, and yeah ue4 is great
|
Eagle
 The Purpose
|
Monday, December 14, 2015
Did you make this map ? Looks really good.
|
|
Shenku
RiO Incarnate
|
Monday, December 14, 2015
Wh1t34Gl3(SAS) wrote : Did you make this map ? Looks really good.
Which map...? The one I've been using for testing since the first post in this thread...? Yeah, I made it. Modeled and placed everything in 3DS Max, and exported them out as grouped objects so I wouldn't have to worry about hand placing them in-engine. I literally just drop like 10-15 meshes into the map and set their positions to 0,0,0, and the map is done.
Probably not the most efficient setup for the rocks and trees, but I didn't feel like hand placing them in UE4 at the time, especially since duplicating objects is so much easier from inside Max.
The textures themselves were borrowed from ZEQ2-Lite's Namek map. While they look good on most of the actually modeled cliff surfaces, they do get a little distorted on the much larger landmasses' cliff sides because of how they were extruded and UVMapped... Overall though, it does look pretty spiffy... I need to make other maps too though, but I'm just too lazy right now...
|
|
Eagle
The Purpose
|
Monday, December 14, 2015
|
|
AngrA000
|
Sunday, December 20, 2015
Excellent
|
|
Shenku
RiO Incarnate
|
Thursday, March 17, 2016
https://youtu.be/fAJ136ovVxQ
Minor update, was bored earlier today and decided to tinker with the aura some more. Fixed it to now rotate based on movement direction and speed, because it statically staying vertical was getting on my nerves...
Rotation is sorta hodge-podged together with a spring-arm attached "look at" target set to lag its position behind slightly during movement, and updated on Tick. It's a lazy solution, and probably not the best, but it works. Plus it lags more or less behind the player based on movement speed, meaning slower speeds don't rotate the aura as much as higher speeds...
|
Zeth
 The Admin
|
Friday, March 18, 2016
It looks fair, but it's really difficult to break down the technique with the camera so far away as it is. Not only that, but analyzing issues are compounded by the fact that it's a white aura against a fairly bright backdrop. Can you try to set up a more contrasting environment with the aura consuming more screen space?
Also, your motion blur effects feel backwards. Camera rotations should have no blur while player movements should have more (to emphasize speed). Zanzoken seems about right, but casual movement is underplayed. I realize this is probably just some shader/script that's based on a pseudo camera velocity from the last position/rotation value, but it's essentially detracting from the emphasis of the effect and accuracy of control.
|
|
Shenku
RiO Incarnate
|
Friday, March 18, 2016
Zeth wrote : It looks fair, but it's really difficult to break down the technique with the camera so far away as it is. Not only that, but analyzing issues are compounded by the fact that it's a white aura against a fairly bright backdrop. Can you try to set up a more contrasting environment with the aura consuming more screen space?
Also, your motion blur effects feel backwards. Camera rotations should have no blur while player movements should have more (to emphasize speed). Zanzoken seems about right, but casual movement is underplayed. I realize this is probably just some shader/script that's based on a pseudo camera velocity from the last position/rotation value, but it's essentially detracting from the emphasis of the effect and accuracy of control.
The brightness of the map is actually something I've been fighting with a lot, and I just haven't gotten it where I want it yet, but it is on my list of things to fix already.
I'm also going to have to remember to setup the camera zoom controls, cause I've been pretty lazy and have kind of forgotten repeatedly to do the 5 minutes of work required to set it up. I'll make sure to correct that as well...
Motion blur is all pre-setup by Unreal's camera/post processing volume settings, I haven't messed with those specific settings just yet, but I can see how it would be a little distracting, so I might just disable it for now. (I thought I already had, but I guess it must have turned itself back on for some reason...)
|
|
Shenku
RiO Incarnate
|
Thursday, March 24, 2016
Would have worked on this sooner, but came down with something Monday that laid me up in bed for almost 2 days, it hurt too much to open my eyes, let alone stare at a computer screen for a few hours... Heck, my chest still hurts... Blegh...
https://youtu.be/2zk7nTqkKo0
Anyways, added the zoom controls, and made a more simplistic map with many many adjustments to make the aura more visible against the background... A lot of adjustments to the map... In fact, the new map I setup for this video is a touch too dark now, but I'm tired of fighting with it right now... As it is, it took me too many hours just to figure out how to go about fixing this issue enough to see the aura, getting it to look right is a battle for another day...
Anyways, second part of the above video shows the "arrow component" I used as my "look at" target that's normally set to be hidden, which I'm using to track where the Aura should point. For the most part, it works, although there is an odd bug when falling with zero horizontal velocity...
|
|
Shenku
RiO Incarnate
|
Tuesday, May 31, 2016
Minor update:
https://youtu.be/nJQTPc1kP10
Improved and updated aura particle handling to no longer swap entire particle systems, but instead change vector parameters to adjust the color in the particle asset itself at run time. Ideally, this will be implemented into a "custom aura color" setting which I'd like to add at some point for the create a character system, if/when I ever get enough clothing and accessories put together and added in to flesh out a decent set of options...
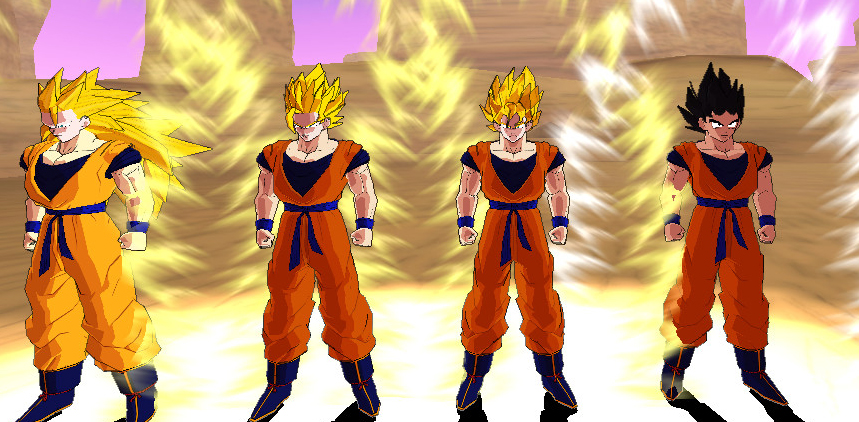
Added 3 new transformation tiers, and reworked some of the code involved in making transformations work slightly as a part of this change. Specifically, all transformations when activated will remain active unless the player lowers their powerlevel below 900,000, at which point they revert back to base form.
Note to self: Add functionality for Transformations to be activated non-sequentially once unlocked, I.e. skipping middle tiers to achieve higher unlocked ones, such as going from base form to SSG or SSGSS/SSBlue.
Also, can not for the life of me figure out why, but my somewhat out of date SVN Media folder has some issues with the Super Saiyan 3 head in every .max file I tried seemingly not being the same mesh from the build folder (UVs were close, but looked to be from an older version of the mesh), so I had to hodge-podge a lackluster UV map together just to get the head mesh into UE4... Face looks okay, but the hair is an atrocious mess...
Oh, and Yeah, SSG and SSGSS/SSBlue aren't exactly accurate, they're just recolored/retextured versions of Normal and Super Saiyan meshes, but they're just placeholders for the moment to help differentiate the tier changes, so whatever...
|
|
Eagle
The Purpose
|
Wednesday, June 01, 2016
Is this the one you found ?
I don't think the current mesh was ever added to the SVN.
Edit: converted the actual mesh to .max. You will have to bind -- or re-map in the worst case -- textures and rig it as well. Sorry for the lack of preparations, I am not enough familiar with 3DS Max to do all of this myself, yet.
|
|
Shenku
RiO Incarnate
|
Wednesday, June 01, 2016
Wh1t34Gl3(SAS) wrote : Is this the one you found ?
I don't think the current mesh was ever added to the SVN.
Edit: converted the actual mesh to .max. You will have to bind -- or re-map in the worst case -- textures and rig it as well. Sorry for the lack of preparations, I am not enough familiar with 3DS Max to do all of this myself, yet.
Yeah, I think it was that one, from back before the Super Saiyan 1 and 2 heads were replaced. Not sure why the current version wasn't already in the SVN, cause I could have sworn it was...
And thanks, I'll fix it up as soon as I install 3ds Max on the new laptop. Was using my old laptop yesterday, and was getting frustrated at having to constantly transfer stuff from it to the new laptop for every time I changed something with the exported file...
|
|
Shenku
RiO Incarnate
|
Wednesday, June 01, 2016
And fixed. That didn't take too long to do. Took me longer to install 3DS Max than it did to apply a skin modifier and export...
Really need to fix my cel-shader post process though, cause it's still making the character's textures so bright the details are getting washed out and blurred together, which is really starting to bug me. Especially when using an aura, since all lighting on the character goes away entirely, and washes out the colors even further...
|
|
Eagle
The Purpose
|
Wednesday, June 01, 2016
I think the assets would need to be updated for an use in more recent engines. Well, it kind of does even for Quake 3, but it's a bit different I guess.
What kind of solution did you came up with for the cel-shading ? Or even the character renders in general. Just curious.
|
|
Shenku
RiO Incarnate
|
Wednesday, June 01, 2016
Wh1t34Gl3(SAS) wrote : I think the assets would need to be updated for an use in more recent engines. Well, it kind of does even for Quake 3, but it's a bit different I guess.
What kind of solution did you came up with for the cel-shading ? Or even the character renders in general. Just curious.
Right now I'm using this, which is pretty much just a post process material shader that I made while following a Cel Shading tutorial. Although I'd like to replace it with a more character specific setup, as opposed to this current "one size fits all" cel-shader, I just haven't seen a better way to do it yet...
|
|
Shenku
RiO Incarnate
|
Wednesday, June 01, 2016
Made some minor adjustments to the materials for the Super Saiyan hairs to override the texture's color and allow me to darken the hair a little bit so it won't blend in with Goku's skin so much...
Also, added in a fix to something that's been bothering me for a while, which is the aura completely blocking the player's view when zoomed in. The aura will now use proper pixel-depth testing to adjust its opacity when too close to the camera. Below is a series of screenshots from several distances with this change in effect. Note that from far enough away, the aura still has the "white-ish core" as often depicted of the Super Saiyan aura in the anime, but will fade out for close-ups allowing the player to see past themselves while boosting (Which the auras often did in the anime as well, so more accurate and user friendly!). Plus it was a quick one minute fix so....
|
|
Eagle
The Purpose
|
Thursday, June 02, 2016
I see. It looks very elaborate when put this way. Changes of plain text. 
|
MDave
 ZEQ2-lite Ninja
|
Friday, June 03, 2016
I didn't know about this project! Impressive work what's the minimum specifications for Unreal 4 games these days?
|
|
Shenku
RiO Incarnate
|
Friday, June 03, 2016
MDave wrote : I didn't know about this project! Impressive work what's the minimum specifications for Unreal 4 games these days?
From this page:
Operating System Windows 7/8 64-bit
Processor Quad-core Intel or AMD, 2.5 GHz or faster
Memory 8 GB RAM
Video Card/DirectX Version DirectX 11 compatible graphics card
My new laptop runs it a lot smoother than my previous one did, and is right around what the recommended specifications listed there are, albeit with Windows 10 instead of 7/8.
My last laptop only had a dual core processor, and was able to run it okay at reduced settings, so the engine is fairly adaptable, but I think the playability of any game made with it is dependant entirely on the expense of the visuals on the system. ZOPU was just skirting the limits of what my old laptop could handle, and has still yet to be optimized for best performance though, so there might be some wiggle room to make it more playable on lower end machines...
|
|
Shenku
RiO Incarnate
|
Sunday, June 05, 2016
Too lazy to record a video for this update, but first time transformations mechanics for Super Saiyan 2, 3, SSG, and SSG-Blue have been added, although the timing needs tweeking still, and there's no specialized animations for any of them yet.
Also updated Kaioken to increase the player's movement separately from normal boosting multipliers, changed it so Kaioken is activated while holding the Charge Button instead of the Boost button (More on why below), and set it to scale the movement increase based on the Kaioken multiplier currently being applied. So Kaioken goes 2-times as fast, Kaioken X2 goes 4 times as fast, exc.
Adjusted boosting to be a toggle, instead of requiring constantly holding the key. This frees up the pinky so I'm not risking breaking my shift key from holding it down all the time... As a result, Super and Energy Skills are now activated while charging instead, which means you can now boost and do mêlée again, where as before boosting would lock mêlée out of being usable. Thematically, this change makes sense, since most attacks, such as Kamehameha, are typically preceded by a brief moment of the character powering up. Likewise Kaioken is similar in function to charging Ki to begin with as they're both based on the idea of increasing the character's power, so it fits there as well. At least, it does for now until I hash out a better setup for handling such abilities...
New Known issues:
Transforming occasionally deactivates the boosting flag, even though the aura is still active.
Reverting to base form from a transformation while boosting is toggled will cause the aura to deactivate, but leaves the player in the "boosted" state, including animating Goku's normal hair which looks... Weird...
Kaioken has no upper-limit to its increase in speed, and will cause the player to move instantly across the map with a tap of the movement key at higher Kaioken levels (20+). Not as noticeable during normal play, but debugging functions (Forcing Kaioken to 500 to charge Ki much faster to overcome soft-limits to Max Powerlevel cause I'm impatient when testing...) make it more noticeable.
|
|
Shenku
RiO Incarnate
|
Saturday, October 01, 2016
https://youtu.be/L04gIwzDs3Y
Mostly finished the new version of the energy attack/skill system.
New setup spawns a "Charge" actor, which then inherits and passes on the needed variables for the attack to look correct. Currently only supports charged energy attacks.
Damage isn't setup yet, colors look a little odd when overlapping other objects in the scene (Due to how additive particles are handled by unreal), and sounds are only partly setup (Plays voice sounds, but effect sounds are not yet added.).
Another bug presently is that Ki keeps draining even after the attack is fully charged... Need to cap that...
|